Thursday, March 31, 2011

Butternut Squash Risotto with Mushrooms and Spinach


This recipe was adapted from a fellow blogger - A Mingling of Tastes. Julie from Chicago has been writing her blog since 2006 - talk about cooking experience! It is a great vegetarian risotto recipe to keep on hand. Risotto is such a delicious dish in general because of the butter and cheese added in at the end but the vegetables are a great touch! I have to admit - I have kind have of a love for rice in general; I got that trait from my mom - someone I think could eat rice everyday of her life. There is nothing wrong with that if they are recipes like this one!

A basic risotto is fairly simple to make; it just takes a patient person and a risotto spoon. Okay, you really don't NEED a risotto spoon, any wooden spoon will do, but I like kitchen gadgets so of course I have one! Risotto takes a lot of gentle stirring so that the rice does not turn to mush, which is why this spoon is cool. Some rice grains get stirred and some go through that cool little hole. Anyway, back to the patience part... when making risotto you cannot walk away from the stove. That is why, especially in this recipe, it is important to have all of your ingredients prepped before you start cooking the rice. Set aside the time to make this - I'm begging you!

If you want to start off easy and just make a simple risotto, go right ahead. Once you get one dinner under your belt, you won't be so scared to make it over and over again, mixing in different ingredients each time! Here is a great article from The New York Times that gives you a few pointers and a good basic recipe - Risotto.

Ingredients:
2 - 2 1/2 cups butternut squash, peeled and cut into half-inch pieces
4 tbsp olive oil, divided
Salt and Freshly ground pepper to taste
1 tsp dried thyme
1/2 tsp dried rosemary
16 oz white button mushrooms, sliced and cut into 1 1/2-inch pieces
5-6 cups vegetable broth (if you run out, substitute hot water)
5 tbsp unsalted butter, divided
2 shallots, chopped
2 garlic cloves, chopped
2 cups Arborio rice
1/2 cup dry white wine
6 oz fresh baby spinach leaves
1/2 cup freshly grated Parmesan cheese

Directions:
Preheat oven to 400 degrees. Line a baking sheet with foil and drizzle with 2 1/2 tbsp of olive oil. On the baking sheet, toss the butternut squash with salt, pepper, thyme and rosemary. Roast until tender and lightly browned, about 20-25 minutes.


Meanwhile, heat 1/2 tbsp olive oil and 1/2 tbsp butter in a skillet over medium-high heat. Add the mushrooms, season with salt and pepper and cook until their water nearly evaporates, about 6 minutes. Reduce heat to low and continue cooking until tender, about 3 more minutes. Set aside.

Heat the vegetable broth (it does not have to boil) in a medium saucepan and keep warm over low heat.

In a large saucepan, heat 1 tbsp of olive oil and 1 tbsp of butter over medium-low heat. Add the shallots and cook until soft but not browned. Add the garlic and cook, stirring constantly for 1 minute. Add the rice and stir constantly for 2-3 minutes until all the grains are slick and slightly opaque. Add the wine and simmer until almost completely absorbed.

Add two ladles full of broth to the risotto and bring to a simmer. Season with a bit of salt and pepper. Keep the risotto at a steady simmer, stirring continuously until the broth has evaporated almost completely. Add one ladle full of broth, stir until it is nearly evaporated, then add another ladle full. Continue simmering and stirring, adding broth as necessary, for about 25-30 minutes or until the rice is creamy and cooked through, but still firm to the bite. When the risotto is on its last ladle full of broth, add the spinach (this will wilt down considerably). Stir until spinach is just wilted. Add the roasted squash and mushrooms. Add 3 1/2 tbsp of butter and Parmesan cheese; stir to combine. Check the seasoning and add more salt and pepper to taste. Serves 6 big-eaters as a main-course.

Tutti Mangia!


Tuesday, March 29, 2011

Banana Bundt Cake


This Banana Bundt Cake recipe is compliments of Dorie Greenspan but I also adapted it from the blog Lottie and Doof. I've told you how amazing Dorie is in other blog posts, so there is no need to reiterate myself, but come on people - you need to try out one of her MANY amazing recipes!

This is a good one to try out because it uses a lot of pantry ingredients except for maybe the sour cream. I know all of you have bananas turning brown in your fruit bowl as we speak - don't lie. That's the best time to use them for this recipe - they will make your cake even sweeter! The addition of sour cream in this recipe is what makes it a cake and not bread to me. You can really taste it's tanginess - it's great! That, combined with a concentrated banana flavor, is intense to say the least.

When you start mixing the ingredients together you will notice there is a lot of batter but not to worry. It will fit in the Bundt pan just fine and nothing will bubble over. Feel free to place your Bundt pan on a cookie sheet when placing it in the oven if you are worried. Wait until you smell this cake baking away in the oven - your whole house will smell nice and cozy!

Ingredients:
3 cups all-purpose flour
2 tsp baking soda
1/2 tsp salt
2 sticks (8oz) unsalted butter, at room temperature
2 cups sugar
2 tsp pure vanilla extract
2 large eggs, preferably at room temperature
4 very ripe bananas, mashed (1 1/2 - 1 3/4 cups) - I used 2 cups total
1 cup sour cream or plain yogurt

Directions:
Preheat the oven to 350F. Generously butter a 9 or 10 inch (12 cup) Bundt pan. Whisk the flour, baking soda and salt together.

Working with a stand mixer, preferably fitted with the paddle attachment, or with a hand mixer in a large bowl, beat the butter until creamy. Add the sugar and beat at medium speed until pale and fluffy. Beat in the vanilla, then add the eggs one at a time, beating for about 1 minute after each egg goes in. Reduce the mixer speed to low and mix in the bananas. Finally, mix in half of the dry ingredients (don't be disturbed when the batter curdles), all of the sour cream and then the rest of the dry ingredients. Scrape the batter into the pan, rap the pan on the counter to de-bubble the batter and smooth the top.

Bake for 65-75 minutes (mine took about 65 minutes exactly), or until a thin knife inserted deep into the center of the cake comes out clean. Check the cake after about 30 minutes - if it is browning too quickly, cover it loosely with a foil tent. Transfer the cake to a rack to cool for 10 minutes before unmolding onto the rack to cool completely.

If you've got the time, wrap the cooled cake in plastic and allow it to sit on the counter overnight before serving - it's better the next day. Makes 14 servings.

This is a great cake to have for breakfast. I use the term "cake" loosely because if it has fruit in it and does not have frosting - I constitute it as a delicious morning treat! Tutti Mangia!

Thursday, March 24, 2011

Chicken Milanese

This recipe is just a fancy name for the breaded chicken cutlets that I grew up on. We had this dish at least once a week. I added grated Parmesan to Mama's recipe though. It is a delicious meal that has become part of my go-to list in the Zolli-Vigeant household. Oddly enough, I would probably not order this dish in a restaurant, regardless of how good it is, because it is THAT simple to make! But if my Mom said she was making this for dinner, I would be sportin' a pretty big grin on my face.

This version of a chicken cutlet recipe hails from Milan, Italy - a place I'd love to go - purely for food indulgence! The crunchy outside coating of this chicken, along with a little tang of Parmesan cheese, made me a happy camper last night around dinnertime.

Ingredients:
1 cup flour (optional)
1 egg beaten with 1 tbsp of water
1 1/2 cups panko breadcrumbs
1/2 cup grated Parmesan
4 small chicken breasts (pounded and flattened)
Salt and freshly ground pepper
Olive or vegetable oil

Directions:
Set up your breading station on the counter with 3 bowls or wide plates - I use pie plates.  Fill one with flour (if using), one with the beaten egg and one with the panko/grated cheese.  Since this recipe requires so little ingredients, it is important to use quality items such as a fresh block of Parmesan cheese grated yourself.  This combines with the Panko to create that lovely crust.  Feel free to substitute regular breadcrumbs instead of the Panko, but Panko crumbs are bigger and therefore give you the crust you want.  Typically I season the chicken with salt and pepper as well as the egg mixture for added flavor.  Make sure you have a clean plate ready to put your breaded chicken on once it goes through the rotation.  First flour, then egg, then breading - make sure to pat the panko/grated cheese mixture into the chicken good!


Now it is time to do the frying!  You can either use a large saute pan or a grill pan for this.  Pour your oil into either pan you choose until it goes up about a quarter of an inch up the side and let it come up to medium-high heat.  Make sure your oil is hot before putting any chicken in the pan or else it will just soak up the oil - not good.  Cook the chicken until it turns golden brown (lower the heat if it gets too brown too quickly).  Don't try to fit all four pieces of chicken in the pan at once, do it in two batches.  It will steam rather than brown if it is too crowded in the pan.  The cooking process takes about 5 minutes on the first side and 4 minutes on the second.


Drain the oil off the chicken by laying it on paper towels once done.  Prepare your other side dishes and you are ready to eat! I served mine this time around with angel hair pasta and steamed carrots.  It's a great meal to make during the week - I hope you give it a try - Tutti Mangia!

Friday, March 18, 2011

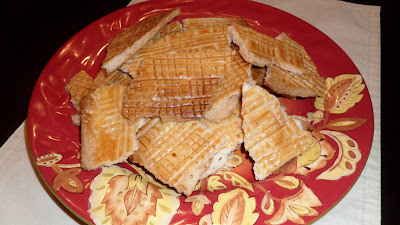
FFwD: Salted Butter Break-Ups


Dorie Greenspan is a genius. Period. I am so glad that I joined the blogging group "French Friday's with Dorie" because otherwise I don't think I would have ever starting replicating her recipes. I am a big fan of the salty/sweet combination that you get from certain foods - this cookie being one of them. I have to admit that I was hesitant to try this recipe because if I want a cookie, I want something covered in chocolate and over the top sweet, but I was pleasantly surprised with this one! When you bite into it, you taste the butter and the salt - oohhhhh so good!

This recipe requires only 6 ingredients - all of which you probably have in your house. I like it already.


It is a simple dough that comes together in a food processor and chills in the fridge for an hour.


It is a very rustic cookie so you don't have to be exact when rolling out the dough.


In a half hour, it bakes up into a beautiful large cookie and you break apart. Hence, the name of the cookie. It's not rocket science people.

If you remember my post on Savory Cheese and Chive Bread, I am not allowed to post the FFwD recipe here on my blog. You need to buy the amazing cookbook, Around my French Table, or e-mail me to send you the recipe.

Tutti Mangia!

Thursday, March 17, 2011

Lamb & Eggplant Lasagna


A few weeks ago I held a monthly girls dinner at my house with some friends. We pick a theme and all cook a bunch of food that revolves around that theme (and drink a lot of wine of course). We call ourselves the Dining Divas (clever, huh?) February's theme was GREEK! I named the event The Santorini Sundown.

This was the full menu:
Appetizers: Hummus/Pita Chips, Tzatziki/Pita Bread, Spanakopita (made by me, post to come later)
Salad: Greek Salad, why of course!
Main Course: Spicy Lamb & Eggplant Lasagna, Italian Turkey Lasagna (for those who did not eat lamb)
Dessert: Fruit/Greek Yogurt, Cupcakes, Honey Cake (made by our resident baker - Lizzy)
Drinks: Blue Aegean Angel and lots of WINE!

When the Greek theme was determined, I knew I wanted to do something with lamb and/or feta cheese. They are the first Greek ingredients that came to mind. When I hold these monthly girls dinners, I like to have as much of the cooking done before everyone arrives, so lasagna was the perfect idea! I stumbled upon this recipe, adapted from Food Network and Mr. Emeril Lagasse. He used a lot more red pepper than me so his recipe was Spicy Lamb & Eggplant Lasagna. I left the "spicy" off mine.

It really surprised me how much the flavor of the lamb came out. That just doesn't happen when I make a sauce with beef or turkey meat. The combination of lamb and beef stock penetrated throughout the sauce and gave it a distinct taste. Not to worry - the eggplant still played an integral role in this dish, it just took a back burner to the meaty sauce. The feta cheese added a tang that mozzarella can't compete with.All in all, this dish was an A+ for me!

You will notice that I made a few big changes to this dish. I omitted the Bechamel sauce altogether in order to lighten it up a little BUT then I added lasagna sheets to beef the dish up. I was cooking for a rather large crowd (15 ladies) and didn't know if everyone liked spicy food so did not use as much red pepper as required. Lastly, I added some shredded mozzarella cheese on top to resemble your typical Italian lasagna. Regardless of what you choose to do, I'm sure it will turn out just perfect!

Ingredients:
30 slices of eggplant (1/4-inch thick), about 3 lbs
3 cups flour (you really only need half as much)
3 eggs beaten with 2 tbsp milk (I needed an extra egg)
3 cups fine dried bread crumbs
Essence, recipe follows
1 cup vegetable oil
1 recipe of Spicy Lamb Sauce, recipe follows
1 lb Feta cheese, crumbled
1 cup mozzarella cheese, shredded 
2 cups Bechamel Sauce, recipe follows

Directions:
Preheat the oven to 375 degrees F. Grease a deep-dish (11x14) lasagna pan. Season the eggplant slices, flour, egg wash and bread crumbs with Essence. Dredge the eggplant in the flour. Dip each eggplant in the egg wash, letting the excess drip off. Dredge the eggplant in the bread crumbs, coating completely.

In two large pans, over medium heat, add 1/2 cup of the oil to each pan. When the oil is hot, pan-fry the eggplant for 2-3 minutes on each side, or until crispy. Be careful not to burn the eggplant or crisp up the outside before the inside cooks. This can happen if you have the heat on too high. Remove and drain on paper towels. Season with Essence. Fry the eggplant in batches.

To assemble, spread 2 cups of the lamb sauce over the bottom of the pan. Crumble 1/3 of the cheese over the lamb sauce. Lay 10 slices of the eggplant over the cheese. Repeat the process with the remaining ingredients.
Spread the Bechamel Sauce over the top and bake for 45 minutes or until golden and bubbly. Although I did not make the Bechamel Sauce, I assembled the lasagna just the same and cooked it just as long. I put the shredded mozzarella on with 10 minutes left so that it did not burn. Remove from the oven and cool for 10 minutes before slicing. Garnish with parsley.

Essence (Emeril's Creole Seasoning):
2 1/2 tbsp paprika
2 tbsp salt
2 tbsp garlic powder
1 tbsp black pepper
1 tbsp onion powder
1 tbsp cayenne pepper
1 tbsp dried oregano
1 tbsp dried thyme


Combine all ingredients thoroughly and store in an airtight jar or container. Yield: about 2/3 cup. This seasoning is so flavorful and great to have on hand for many other recipes!

Spicy Lamb Sauce:
2 tbsp olive oil
1 lb ground lamb
Salt
2 tsp crushed red pepper (I used 1 tsp)
2 cups finely chopped onions
1/2 cup finely chopped celery
1/2 cup finely chopped carrot
Freshly ground pepper
2 tbsp chopped garlic
2 (28-ounce) can of peeled, seeded and chopped tomatoes
1 small can tomato paste
3 cups beef stock or water
2 sprigs of fresh thyme (I used dried)
2 bay leaves
2 tsp dried oregano
2 tsp dried basil
2 ounces Parmigiano-Reggiano (I omitted this)

In a large nonreactive saucepan, over medium heat, add the oil. When the oil is hot, add the meat and season with salt and crushed red pepper. Brown the meat for 4-6 minutes. Add the onions, celery and carrots. Season with salt and pepper. Cook for 4-5 minutes or until the vegetables are soft. Add the garlic and tomatoes. Season with salt and pepper. Continue to cook for 2-3 minutes. Whisk the tomato paste with the water (or beef broth) and add to the tomatoes. Beef broth imparts SO much more flavor than water, so I would not skimp here. Add the thyme, bay leaves, oregano, basil and red pepper. Mix well. Bring the liquid to a boil, reduce the heat to medium and simmer for about 2 hours. Stir occasionally and add more liquid if needed. During the last 30 minutes of cooking, reseason with salt and pepper and stir in the cheese. Remove from the heat and let sit for 15 minutes before serving. Yield: about 4-6 cups.

For the Bechamel Sauce recipe, click here.

I love most of Emeril's recipes but they are typically very labor-intensive and require many ingredients. For that reason, they definitely do NOT lack in flavor, but they do need to be planned out before. This is a great recipe to complete on a weekend day when you have lots of time to let this sauce simmer. It will make your house smell amazing! You can think of this recipe as a creative alternative to your regular Italian lasagna. Believe me when I tell you, most of the ingredients are the same, but it tastes NOTHING like lasagna you've ever had. I want to thank my awesome sister and all my girlfriends who helped to make Greek Night a success!

Tutti Mangia!

Tuesday, March 15, 2011

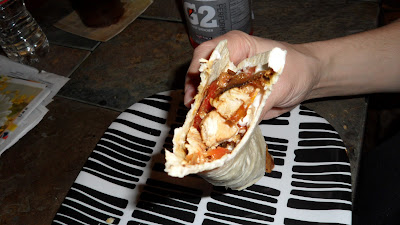
Sizzling Chicken Fajitas

I was in the mood for Tex-Mex for dinner last night so why not fajitas! These are easier to make than driving to a restaurant, trust me. Normally if you have time, it is best to marinate your meat (chicken, beef or fish) before cooking it up, but it was a Monday and I didn't have time. I opted to using dry spices for flavor instead and it worked out just fine. There are plenty of fajita recipes that you can find online but I like this one from Paula Deen on Food Network. It is straight-forward and to-the-point!


Ingredients:
1/4 cup vegetable oil, divided
3 tbsp lemon juice (omitted)
1 garlic clove, minced (omitted)
1 tsp ground cumin
1 tsp garlic powder
1 tsp onion powder
Salt / Freshly ground pepper

1 1/2 lbs meat (boneless, skinless chicken breast, skirt steak or peeled and deveined shrimp)
1 medium onion, halved and sliced lengthwise
1 green bell pepper and 1 red bell pepper, sliced (I used yellow and red)

8 (8-inch) flour tortillas
1 lime, juiced, for topping (omitted) 
Sour cream, for topping
Salsa, for topping
Guacamole, for topping (omitted only because I didn't have it on hand) 
Cheddar cheese, shredded, for topping


Directions:
In a heavy duty resealable plastic bag, combine 2 tbsp of the vegetable oil, lemon juice, garlic, cumin, garlic powder, onion powder, hot sauce, salt, pepper and your choice of meat. Seal and toss the bag around to coat. Marinate in the refrigerator. *Cook's Note: 15 minutes for shrimp, 20 minutes for chicken and 1 hour for skirt steak. No, I did not have an extra 20 minutes if you must ask. I just seasoned the chicken with the spices listed above and cooked it!

Preheat your cast iron servers in a preheated 400 degree F oven for at least 20 minutes, to get a good sizzle when you plate the fajitas. I did not have these, no need to worry if you don't either!

Heat the outside grill or a large indoor grill pan to medium-high heat. Remove the meat from the marinade and place it on the hot grill, discard the marinade. Cook chicken until cooked through, about 5 minutes per side, skirt steak about 3 minutes per side for medium-rare and about 2 minutes for shrimp. Slice the chicken and steak into strips if you are using.

In a large skillet heat up the remaining 2 tbsp vegetable oil and fry the onions and bell peppers until crisp-tender with some salt and pepper. I put the cooked chicken back in this pan when the vegetables were almost done so it could heat through and combine.

Wrap the tortillas in foil and warm them in the oven with the servers for 15 minutes. I warmed my tortillas on a sheet pan in the oven for 8 minutes.

When you are ready to serve, remove the cast iron servers from the oven and quickly arrange the meat and peppers and onions on it. Serve immediately with the warm tortillas and other accompaniments. This recipe said it serves 8, but I'm unsure who eats only one fajita? Not this girl!

Tutti Mangia! This definitely satisfied my craving for Tex-Mex!

Friday, March 11, 2011

Mozzarella and Proscuitto Pizza with Balsamic Onions


I adore homemade pizza and love finding new ways to make it more creative! This recipe, adapted from the Epicurious/Bon Appetit website, was interesting to me because it did not involve your typical red sauce. The "sauce" was essentially created with homemade garlic oil and caramelized onions cooked in balsamic vinegar. This pizza has many different layers that really make it a flavor packed meal!


Dough: look on Epicurious for ingredients

Toppings:
2 tbsp plus 1/2 cup olive oil
1 12-ounce red onion, thinly sliced
2 tbsp balsamic vinegar
2 tsp Worcestershire sauce
4 large garlic cloves, chopped
1 large red bell pepper

Baking:
All purpose flour
1 cup (packed) grated mozzarella cheese
3 tbsp grated Parmesan (I used Asiago)
4 thin slices prosciutto, sliced crosswise into thin strips
2 tsp chopped fresh thyme (I used dried)
Balsamic vinegar


For dough: I used Pillsbury dough, but click the link above for homemade dough directions.

For toppings: Heat 2 tbsp oil in medium skillet over medium-high heat. Add onion and saute until golden, about 12 minutes. Add vinegar and Worcestershire. Reduce heat to medium-low; simmer until liquid cooks away and onion is very tender, about 4 minutes; season onion with salt and pepper.


Heat remaining 1/2 cup oil in heavy small skillet over medium-low heat. Add garlic and saute just until garlic begins to brown, about 4 minutes. Using slotted spoon, transfer garlic to custard cup. Pour oil into separate small bowl.


Char bell pepper over gas flame or in broiler until blackened on all sides. Enclose in paper bag; let stand 10 minutes. Peel, seed and slice thinly. (Onion, garlic, garlic oil and pepper can be made 1 day ahead, Cover separately; chill.)


The ingredients for the pizza are shown here and go on starting at the top left through the bottom right. Shown are the garlic oil, mozzarella, garlic bits, balsamic onions (top row), roasted red peppers, Asiago cheese, prosciutto and thyme (bottom row). If you prep these ingredients before-hand, your final product will come together very quickly!


For baking: Position rack in bottom third of oven. Roll dough onto a large baking sheet to a 12-inch round or rectangle.Bake the dough by itself in the oven for 10 minutes. Then, flip it over and prepare your other ingredients that will go on top.


Brush 1 tbsp reserved garlic oil over dough, leaving 1/2-inch plain border. Sprinkle with mozzarella, then reserved garlic bits.


Strew balsamic onion and then roasted pepper strips in a pattern over the top. Sprinkle with Parmesan.


Bake the pizza again for 8 minutes. Rotate pizza half a turn. Bake until crust is deep brown, about 5 minutes longer. Arrange prosciutto atop pizza. Bake with prosciutto, about 5 minutes. Sprinkle with thyme. Cut into 8 pieces. Serve, passing more vinegar and garlic oil separately. (The baking instructions here were modified by me but for the full recipe, see link above.)

I made this pizza on a weeknight and saved time by using pre-made pizza dough. The reviews on this website did all say that the homemade dough was great so I will end up trying it one day. If you are one of those people that plans ahead, prep most of the ingredients a night ahead so when you get home from work you can throw them on the dough and cook it off - done!

I loved this pizza regardless because the ingredients on top were superb! You can make this pizza a vegetarian one by omitting the prosciutto.I liked the salty kick from the prosciutto and Asiago cheese though; it was a nice touch. The caramelized red onion was sweet but also had a tang that it picked up from soaking in the balsamic vinegar. Lastly, you could really taste the garlic flavored oil - it was subtle and not too overpowering.

There was a lot going on, but all good things! Tutti Mangia!

Thursday, March 10, 2011

Provencal Grilled Chicken and Herbed Penne

I am Italian and could probably eat pasta everyday if I was allowed to. The thing I love about pasta dishes is that you can mix  in almost any combination of ingredients to make it taste completely new and exciting. This recipe, adapted from the Better Homes & Gardens website, combines pasta, veggies, herbs de Provence and some sharp Asiago cheese. For those of you who do not own a spice called herbs de Provence, I would highly recommend picking one up - you can use it in so many different ways. It is basically a blend of multiple spices such as thyme, tarragon, dried lemon zest, fennel seeds, lavender and bay leaf. It is most popularly used in French cooking. Here are a few recipes from other fun blogs that involve herbs de Provence for your viewing pleasure:
Herbs de Provence Chicken
Roasted Potatoes Herbs de Provence
Pork Tenderloin with Herb Glaze
Provencal Stuffed Portabellos


Ingredients:
8 ounces penne pasta (I used ziti)
4 medium skinless, boneless chicken breast halves (about 1 lb total)
1 medium zucchini, halved lengthwise (I cut it into four pieces, lengthwise)
8 thick asparagus spears (8-10 ounces total), trimmed (I bought skinny asparagus so used roughly 20 spears)
3 tbsp olive oil (I used about 6 tbsp)
1 tbsp herbes de Provence, crushed (crushing it brings out the flavor)
1 tbsp snipped fresh thyme (I used dried)
1/2 cup shredded Asiago or Pecorino Romano cheese (I used more than that!)

Directions:
1. Cook pasta according to package directions. Meanwhile, rinse chicken; pat dry. Brush chicken, zucchini and asparagus with 1 tbsp of the oil; sprinkle all sides with herbs de Provence and 1/2 tsp salt.

2. Place the chicken in center of the lightly greased rack of an uncovered grill; place the zucchini and asparagus around chicken. Grill directly over medium heat for 12-15 minutes or until chicken is tender and no longer pink and vegetables are tender, turning once. I roasted the zucchini and asparagus in the oven and cooked the chicken on my grill pan on top of the stove. 

3. Transfer chicken and vegetables to cutting board; cool slightly. Cut chicken and zucchini into 1-inch cubes; slice asparagus into 1-inch-long pieces. Drain pasta; return to saucepan. Add chicken, vegetables, remaining oil and thyme to pasta; toss well. Divide among 4 dinner plates; top with cheese and season with pepper. I put the 1/2 cup shredded Asiago cheese and the extra 3 tbsp olive oil into the saucepan with all the other ingredients. THEN, I put extra shredded cheese on top of my dish.

This is a great way to get a large serving of vegetables into your pasta (not to be a mom or anything). Next time I make this recipe, I will use 2-3 zucchini's and a bit more asparagus, but keep the chicken and pasta amounts the same. Roasting them really imparts great flavor - it is my favorite way to eat them!

Tutti Mangia!

Wednesday, March 9, 2011

Cookies & Cream Cake

This is an older recipe that I never posted but there is no better time than the present! Isn't that a famous quote? I think I made this cake for my birthday? Yes, you read that correctly... I made myself a birthday cake. You see, the reason why is because I have a serious nut-allergy and have trust issues with people other than my mother making baked goods for me. But enough about me, let's talk about this amazing cake!

Beware - if you are looking for an "easy" cake recipe, this is not it... BUT if you are up for a challenge and happen to also love Oreo cookies, then this recipe is for you! It is time consuming because of the many steps and essentially the three different layers you have to make: the cake, the filling and the frosting. I wouldn't say it was difficult to make, just labor intensive - especially for someone who did not have a Kitchenaid stand mixer at the time. Ugh.

Ingredients:
For the cake:(I typically don't mess with "baking" ingredients)
2 cups sugar
1 3/4 cups all-purpose flour
3/4 cup cocoa powder
1 1/2 tsp baking powder
1 1/2 tsp baking soda
1 tsp salt
2 eggs
1 cup milk
1/2 cup vegetable oil
 2 tsp vanilla extract
1 cup boiling water

For the filling:
1 1/4 cups heavy cream
1/8 cup confectioners' sugar
1/4 tsp vanilla extract
10 chocolate sandwich cookies, chopped (I can't remember exactly how many I used, but it was more than 10 that's for sure)

For the frosting:
1/2 cup unsalted butter
2/3 cup cocoa powder
3 cups confectioners' sugar
1/3 cup milk
1 tsp vanilla extract

Directions:
To make the cake, preheat the oven to 350 F. Grease and flour two 9-inch round baking pans. Stir together the sugar, flour, cocoa, baking powder, baking soda and salt in a large bowl. Add eggs, milk, oil and vanilla; beat on medium speed for 2 minutes. Stir in boiling water (batter will be thin). Pour batter into prepared pans. Somehow, I had a lot of batter leftover so I made a small 9' square cake in addition to the larger cake.

Bake 30-35 minutes or until a toothpick inserted in the center comes out clean. Cool 10 minutes; remove from pans to wire racks. Cool completely.

To make the filling, in the bowl of an electric mixer fitted with the whisk attachment, combine the heavy cream, confectioners' sugar and vanilla. Beat on low speed until all sugar is incorporated; increase speed to high and whisk until stiff peaks form. Gently fold in chopped cookie pieces with a rubber spatula.


To make the frosting, melt the butter in a medium bowl. Stir in the cocoa. Alternately add confectioners' sugar and milk. beating to spreading consistency. Add small amount additional milk, if needed. Stir in vanilla.

To assemble the cake, place one cake layer on a cardboard cake circle. Pipe a ring of the chocolate frosting around the outside edge of the cake. Fill the area inside the ring of frosting with a thick layer of the cookies and cream mixture. Place the second cake layer on top. Frost the sides of the cake layers with chocolate frosting. Pipe a decorative border of the chocolate frosting on top of the cake. Fill the area inside this border with a thick layer of the cookies and cream mixture. Garnish with extra chocolate sandwich cookies and whipped cream if desired. As you can see, I completely disregarded this section on how to assemble the cake and did my own thing... shocker. By the picture below, I still think my cake came out pretty!
This recipe was adapted from another blog that I follow - Annie's Eats. She had adapted the cake and frosting recipes from Hershey's and the filling recipe from Thyme for Food. I love the "circle of friends" I have found in the online world - who would have ever thought we would be able to do something like this 10+ years ago?

I chose to blog about this recipe in particular because it involves a LOT of chocolate - one of my favorites foods, next to cheese that is. For those of you who are Catholic out there, today is the first day of Lent, which means I have to give something up until April 24th. I chose to give up eating and baking with chocolate... so this is the last "chocolate" post you will see until Easter Sunday. You better believe I will be making a HUGE chocolate on chocolate cake for Easter. Tutti Mangia! 

Monday, March 7, 2011

Boursin Stuffed Mushrooms

I had a little get-together for the Oscars a few weekends ago. We ordered two kinds of boneless wings from a local restaurant, I made a rather-large Greek salad, these stuffed mushrooms and lots of wine. The Oscars were pretty boring in my opinion, but we ate good food, and that's all that matters! Stuffed mushrooms are probably one of my favorite appetizers items because I love cheese and mushrooms both! I've made them with different kinds of cheese before and Brie has been my favorite!

If at any given time you looked in my refrigerator, you would find between 3-6 different kinds of cheese, I can promise you that. This time when I looked, I found a container of Boursin Garlic & Herb cheese and decided that was the lucky winner! Wonderful choice - and it may be my new favorite... ? You can find the recipe here, since I modified it from the Boursin website.


Ingredients:
1 package (10 oz) mushrooms (about 15-16)
2 tbsp unsalted butter
1/4 cup finely chopped onion
1/4 cup unseasoned bread crumbs (I used seasoned)
1 pkg (5.2 oz) Boursin Garlic & Herbs
1 tbsp chopped fresh parsley
1/4 tsp salt
1/8 tsp ground black pepper
2 tbsp grated Parmesan cheese (optional, I didn't use)

Directions:
Preheat oven to 400F. Remove and chop mushroom stems. In 12-inch skillet, melt butter over medium-high heat and cook mushroom stems and onion, stirring occasionally, 5 minutes or until tender. It took me about 10 minutes to get them tender.


In medium bowl, pour mushroom mixture over bread crumbs. Stir in Boursin, parsley, salt and pepper. Evenly spoon mushroom mixture into mushroom caps; arrange on baking sheet. I actually put my mushroom caps on the baking sheet and in the oven for 15 minutes by themselves before I stuff them and throw them back in the oven for the required amount of time.


Bake 20 minutes or until mushrooms are tender and golden. Sprinkle with cheese. I thought the Boursin was cheesy enough so I did not add any Parmesan cheese.  

A basic Stuffed Mushroom recipe is really great to have in your repertoire because you can change the recipe to your liking. You can stuff them with different types of cheeses or meats such as crab, sausage or beef. You can choose to use large portobello mushrooms or small white button mushrooms like I did here. I personally like using the smaller ones because you can just pop them in your mouth. Then, that ooey-gooey cheese distributes over your tongue.... I can't get enough and you won't want to either when you try this recipe! Tutti Mangia!

Related Posts Plugin for WordPress, Blogger...