Thursday, October 21, 2010

Prosciutto Chicken Breasts

 
I'm very sorry about the lack of blog posts recently. I was in Washington DC for a work event and then went on to Baltimore for a short vacation, yet I was still gone a whole week! The night before I left, I decided to use up a few ingredients left in my fridge since they would have went to waste anyway. I had chicken breasts in the freezer along with cheddar cheese and prosciutto in the fridge. VOILA - dinner would be served! This was a very easy but flavorful and delicious dinner! I made three chicken breasts so that Shaun would have one good dinner while I was gone. I found a recipe online that gave me the idea for this but I put my own spin on it (courtesy of Real Simple).

Ingredients:
3 chicken breasts
Olive oil
Ground black pepper 
1 teaspoon dried oregano
2 teaspoons garlic powder
6 slices of prosciutto
Cheddar cheese

Drizzle chicken breast with olive oil and season with spices. The reason I did not use any salt on the chicken was because the prosciutto is full of it, but feel free to if you would like. If you notice in the picture that my chicken looks thinner than yours, that is because I always pound out my chicken that way so it cooks evenly. 
More Surface Area = More Flavor!

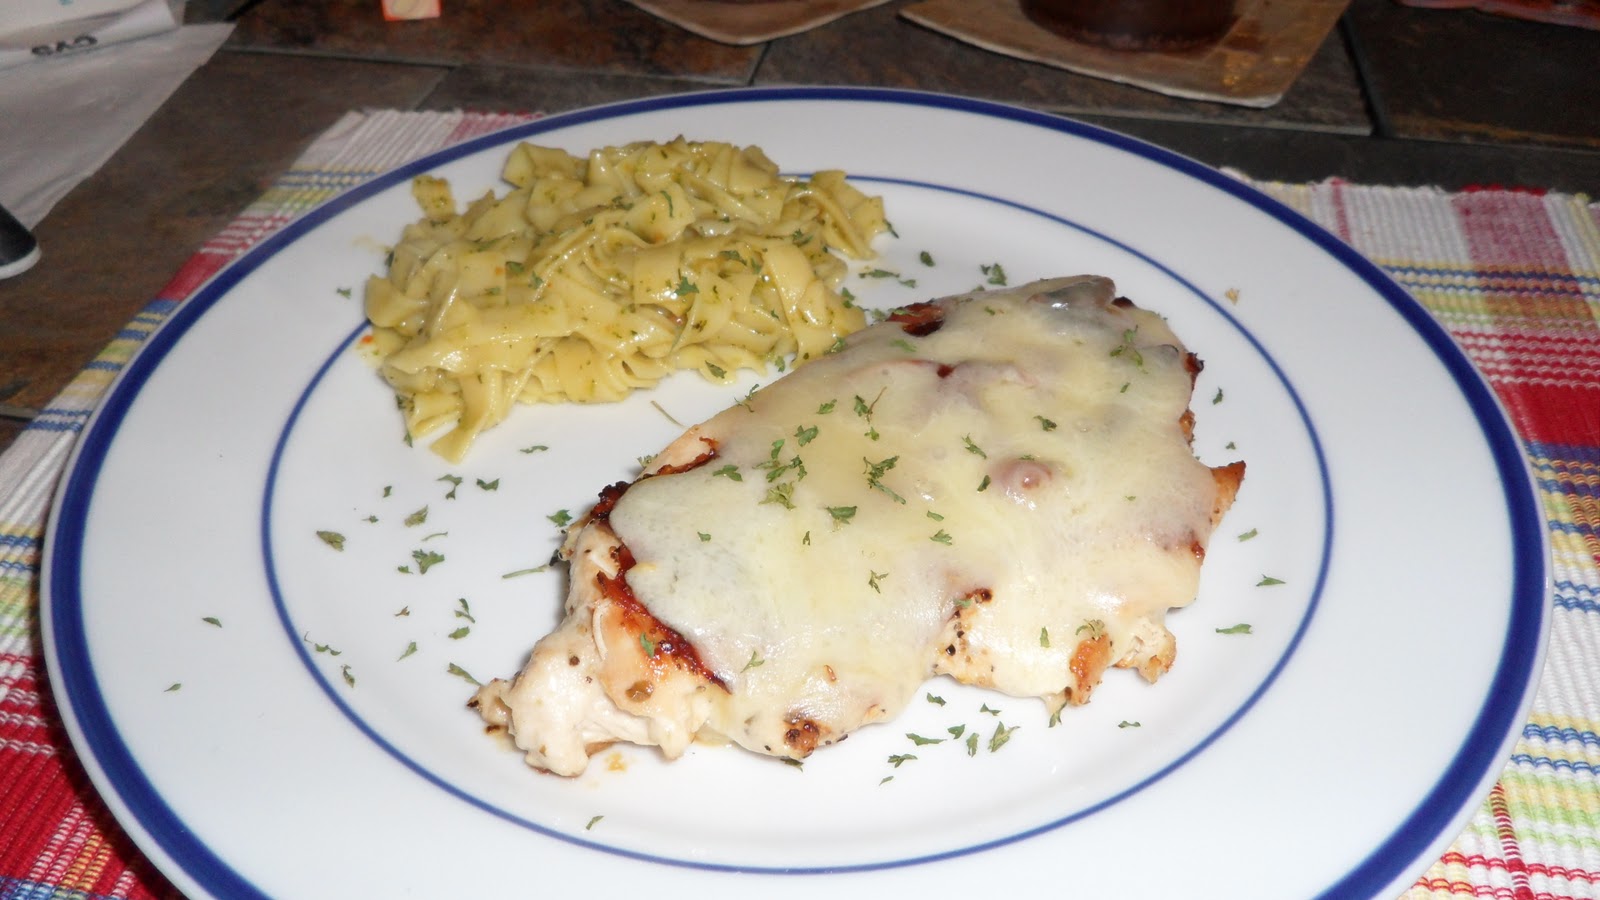
Saute the chicken breast in a pan on one side until it turns white. Go ahead and flip the chicken at this point. Then, lay 2 slices of prosciutto on each chicken breast (cooked side up). You need make sure the chicken cooks up on both sides before the prosciutto has a chance to get too crisp or burn! Once that second side is almost done cooking, turn the chicken one more time so that the prosciutto is now on the bottom of the pan. This will allow it's fat to render and it to get crispy and delicious!

Flip the chicken just one more time so that the prosciutto is back on top again.At this point you want to put the slices of cheddar or any cheese on top so that it can start melting. You should not jump to this point until the chicken is basically cooked through. It will not take more than a minute or two for  the cheese to melt, especially if you put a lid on your saute pan to hold in the heat. This recipe would serve three people just fine, with a side dish or two to complete the meal of course!

Tutti Mangia!


Friday, October 8, 2010

Caramel S'more Cups

I got an email yesterday from Betty Crocker (yes I subscribe to their email lists) with this recipe. It looked so incredibly easy and I was craving chocolate so I decided to make them last night. You can't go wrong with a chocolate chip cookie, caramel, marshmallows and more chocolate, can you? BTW - Happy Birthday Mike (my awesome brother going to school out in Arizona)! These are for you!

1 pouch (1 lb 1.5 oz) Betty Crocker® chocolate chip cookie mix
1/2 cup butter or margarine, softened
1 egg
24 round chewy caramels in milk chocolate, from 3 (1.91-oz) rolls, unwrapped
72 mini marshmallows (about 3/4 cup)
1/3 cup semisweet chocolate chips

Heat oven to 350°F. Spray 24 mini muffin cups with cooking spray. Make cookie dough as directed on package, using butter and egg. Shape dough into 24 (1 1/2-inch) balls. Place 1 ball into each muffin cup.

Bake 13 to 15 minutes or until edges begin to brown. Remove from oven; firmly press 1 candy into center of each cookie until flush with cookie top. Top each with 3 marshmallows. Bake 2 to 4 minutes longer or until marshmallows are puffed. Cool 10 to 15 minutes. Loosen edges of cookie with small metal spatula and remove to cooling racks. Cool completely.

Place chocolate chips in small resealable freezer plastic bag. Microwave on High about 1 minute or until softened. Gently squeeze bag until chocolate is smooth; cut off tiny corner of bag. Squeeze bag to drizzle chocolate over marshmallows. Let stand until hardened, about 10 minutes.

Tutti Mangia!

Thursday, October 7, 2010

Risotto with Pancetta and Wild Mushrooms

Risotto is one of my absolute favorite dishes to make. It is actually quite simple to make so I'm unsure why people are so scared of it. The one thing that I can think of is that you need to stand near the stove the entire 20+ minutes that the risotto is cooking - it requires constant stirring. Thankfully I have an awesome boyfriend who stood by the stove with me while the risotto was cooking. I'd like to say that he loves to be helpful in the kitchen but the fact is he was just starving - I love him regardless!

I used one of my MANY cookbooks to find this recipe. It came from the book "Food & Wine 2000: An Entire Year's Recipes from America's Favorite Food Magazine." It is an amazing cookbook with over 500 recipes and tons of photos. Another few reasons I love this cookbook are because it has sample menus (using recipes from the book), wine recommendations and tips from the editors of their magazine. I've included the recipe below, adapted from Food and Wine, with a few minor tweaks of my own. No surprise there! 

 8 paper-thin slices of pancetta or bacon (about 2 ounces) I used diced pancetta
1 tablespoon extra-virgin olive oil
1 pound mixed mushrooms, such as chanterelles, cremini and Portobellos, thickly sliced
Sea salt
3 tablespoons unsalted butter
1 teaspoon finely chopped parsley or tarragon I used both, split evenly
1/2 cup white wine (I clearly added this ingredient on my own)
5 cups light chicken stock or canned low-sodium broth
1 garlic clove, lightly smashed I minced up my garlic because I love the flavor
1 shallot, minced Didn't have one so I used half of a regular onion
1 1/2 cups Arborio rice
1/2 cup freshly grated Parmigiano-Reggiano cheese, plus shavings, for garnish
2 tablespoons heavy cream Omitted this, didn't miss it!
Freshly ground white pepper


Preheat the broiler. Arrange the pancetta slices on a baking sheet in a single layer and broil for 1-2 mins or until golden and sizzling. Drain on paper towels, then crumble. I sauteed the pancetta in a small frying pan because I didn't want to use the stove!

In a large nonstick skillet, heat the oil. Add the mushrooms, season with salt and cook over high heat, stirring, just until they exude their juices, 3 to 4 minutes. Transfer the mushrooms and their liquid to a strainer set over a bowl and press lightly on the mushrooms; reserve the liquid. Wipe out the skillet and add 1 tablespoon of the butter. Return the mushrooms to the skillet and cook, stirring, until tender and just beginning to brown, about 3 minutes. Add the parsley, cover and keep warm.

In a medium saucepan, combine the stock with the reserved mushroom liquid and bring to a simmer, then keep warm over low heat. In a large, deep nonstick skillet, melt 1 tablespoon of the butter. Add the garlic and cook over moderate heat until fragrant. Add the shallot and cook until softened but not browned, 3 to 4 minutes; discard the garlic. Add the rice and stir until the grains are thoroughly coated with butter.

Add 1 cup of the hot stock to the pan and cook, stirring constantly, until the rice has absorbed most of the stock, 1 to 2 minutes. Continue to cook the risotto, adding the stock 1 cup at a time, and stirring constantly between additions until it is absorbed. Cook the risotto until it has a creamy, porridgelike consistency, about 20 minutes.

Remove the risotto from the heat and stir in the grated Parmigiano-Reggiano, the cream and the remaining 1 tablespoon of butter. Season with salt and white pepper and transfer to warm soup plates. Garnish with the mushrooms, pancetta and shavings of Parmigiano-Reggiano. Serve immediately.

Risotto is a classic Italian specialty and I'm proud to say it is one of my specialties as well! This dish in particular screams "Italian" to me, probably because of the specific ingredients - wine, pancetta, arborio rice and grated Parmigiano-Reggiano cheese. Come on! "The salty crunch of the pancetta serves as a palate-pleasing counterpoint to the tenderness of the mushrooms, with the al dente rice making a midpoint between the two," says the cookbook writers. I hope you enjoy this dish as much as I did!


Tutti Mangia!

Tuesday, October 5, 2010

Caramel Crunch Snickerdoodles

Does anyone shop at Hannaford? I sometimes do and when I'm in there I grab their "Fresh Magazine" right up at the front. It includes some pretty awesome recipes, including these cookies. I'm in AUTUMN mode with my cooking now so this recipe was a "must-make" for me! I always thought snickerdoodles involved some sort of a nut but that could not be more wrong... Snickerdoodles are a type of sugar cookie made with cream of tartar and rolled in cinnamon sugar. For those novice bakers out there that do not know what cream of tartar is - you can find it in the spice aisle at the food store. It is an acidic kind of salt and is actually an active ingredient in baking powder. Cream of tartar is used to make sure these cookies aren't dense and it did it's job! They were both moist and chewy but the caramel gave it a nice crunch!

3 cups sugar, divided
1 tsp ground cinnamon
2 1/2 cups all-purpose flour
2 tsp cream of tartar
1 tsp baking soda
1/4 tsp salt
1 cup (2 sticks) unsalted butter, at room temperature
2 eggs
1 tsp vanilla extract

1. Line a baking sheet with heavy-duty foil and spray with cooking spray.

2. Prepare the caramel crunch. In a large, heavy skillet heat 1 cup of the sugar over medium heat, stirring occasionally with a wooden spoon to help it melt evenly. When the sugar is melted, lower heat to medium-low and cook to a golden color, about 3 to 6 minutes. Immediately pour the caramelized sugar carefully onto the prepared baking sheet. Tilt the sheet so that sugar spreads to a thickness of no more than 1/8 inch. Allow to cool until hard and cool to the touch, about 30 minutes.You will be surprised on how easy caramel is to make! It was my first time HEHE

3. Break the caramel into several pieces, then place on a cutting board and use a knife to chop into 1/4- to 1/2-inch pieces.

4. Preheat the oven to 325degreesF. Line 2 baking sheets with parchment paper, or spray with vegetable cooking spray. In a small bowl, stir 1/2 cup of the sugar together with the cinnamon. Set aside.

5. Make the cookies. In a medium bowl, sift together flour, cream of tartar, baking soda, and salt. Set aside. In a large bowl, use an electric mixer on medium speed to beat the butter and remaining 11/2 cups sugar until smooth, about 1 minute. Mix in the eggs and vanilla until blended. On low speed, mix in the flour mixture until it is incorporated. Stir in the chopped caramel pieces.The dough will be stiff.


6. Scoop out a well-rounded tablespoon of dough and roll between your palms into a smooth ball. Roll ball in the cinnamon sugar mix. Repeat with remaining dough and place balls 3 inches apart on the baking sheets.


7. Bake cookies, one sheet at a time, just until the edges are golden but the centers are pale and feel soft if lightly touched, about 15 to 18 minutes. Cool the cookies for 5 minutes on the baking sheets, then transfer to a wire rack to cool. Serve or store in a tightly covered container for up to 3 days, or freeze.

These cookies are about 120 calories each and 5 grams of fat. Worth every calorie though, I must say! Although, do I say that about all my cookies that I bake? Either way - Tutti Mangia!


P.S. I love homemade caramel!

Friday, October 1, 2010

Citrus Pound Cake with Orange Sauce


This was my first experience making pound cake from scratch. I used to be impartial to Sara Lee's frozen pound cake because it was easy but I will be using that NO MORE! Not to say that this recipe is easy, because for a novice cooker it is not, but it is definitely worth the effort.
 
For those of you who do not know, the name pound cake originated because the ingredients for them used to be one pound each of butter, sugar, eggs and flour... that is definitely not the case anymore. I've read that apparently recipes that had simple ingredients were common because most people couldn't read. Thankfully, I can read, and when I saw this recipe that I had cut out from one of my old Cooking Light magazines, I had to make it! Pound cake dates back to the 1700s and is still a hit today, or so say my co-workers. *wink wink*

Cake:
1 tablespoon all-purpose flour
2 1/4 cups all-purpose flour (about 10 ounces)
1 teaspoon baking powder
1/4 teaspoon salt
1 3/4 cups sugar, divided
10 tablespoon butter, softened
1/2 cup (4 ounces) Neufchâtel cheese, softened
1 teaspoon grated lemon rind
1 teaspoon grated orange rind
3 large eggs
1/2 cup low-fat buttermilk
1/4 cup fresh orange juice
2 tablespoons fresh lemon juice
3 large egg whites

Sauce:
2 cups fresh blood orange juice (about 12 oranges)
2/3 cup sugar

Preheat oven to 325°. To prepare cake, coat a 10-inch tube pan with cooking spray; dust with 1 tablespoon  flour. Set aside. Lightly spoon 2 1/4 cups flour into dry measuring cups; level with a knife. Combine flour, baking powder, and salt; stir well with a whisk.


Combine 1 1/2 cups sugar, butter, and cheese in a large bowl; beat with a mixer at medium speed until well blended (about 7 minutes). Add rinds; beat well. Add 3 large eggs, 1 at a time, beating well after each addition.

Combine buttermilk, 1/4 cup orange juice, and lemon juice. Add flour mixture and buttermilk mixture alternately to sugar mixture, beginning and ending with flour mixture.

Place egg whites in a medium bowl. Beat with a mixer at high speed until soft peaks form, using clean, dry beaters. Add remaining 1/4 cup sugar, 1 tablespoon at a time, beating until stiff peaks form. Gently fold one-third of egg white mixture into batter, and fold in remaining egg white mixture.

Spoon batter into prepared pan. Bake at 325° for 1 hour and 10 minutes or until a wooden pick inserted in center comes out clean. Cool in pan on a wire rack for 10 minutes. Remove cake from pan; cool completely on a wire rack.


To prepare sauce, combine the blood orange juice and 2/3 cup sugar in a large, heavy saucepan; bring to a boil, stirring until sugar dissolves. Reduce heat, and simmer until reduced to 1 cup (about 30 minutes). Serve sauce with cake. Each slice is 316 calories and 10 grams of fat.

I think my favorite part of making this cake was beating the egg whites and sugar to make that cool "whipped cream" texture. The science behind recipes still ceases to amaze me. Please try out this recipe for a yummy breakfast treat! Tutti Mangia!


Related Posts Plugin for WordPress, Blogger...